Istanbul Airport: Difference between revisions
(styling fix for pushback procedure tables) |
(style test) |
||
| Line 1,298: | Line 1,298: | ||
|- | |- | ||
|'''Alternate''' | |'''Alternate''' | ||
The ACFT shall be pushed back following the pushback line onto TWY facing East abeam stand E3. | The ACFT shall be pushed back following the pushback line | ||
onto TWY facing East abeam stand E3. | |||
Taxi out via T9 TWY. | Taxi out via T9 TWY. | ||
Revision as of 05:26, 22 January 2023

Istanbul Airport (IATA: IST, ICAO: LTFM) is the biggest airport in Turkiye. Located in north west of Istanbul, the airport is the busiest and biggest airport in Europe as per 2022 statistics of EuroControl[1]. The airport has 5 runways, fuel farm, dedicated cargo area consisting of 5 apron (29 heavy stands), several warehouses and facilities (biggest one being Turkish Cargo followed by DHL and UPS), and is home to world's biggest airport terminal (under one roof).
The airport has not been completed. As of January 2023, only Phase 1a and 1b is finished. The final phase of the airport includes 8 runways, 2 terminals with 1 satellite terminal.

Sceneries
Payware
There are multiple payware options depending on the simulator for Istanbul Airport. You can find more information from the table below.
| Simulator | Developer | Publisher | Links |
|---|---|---|---|
| P3D v4/v5 | SceneryTR | SceneryTR | https://secure.simmarket.com/scenerytr-stanbul-airport-ltfm.phtml |
| X-Plane | SceneryTR | Aerosoft | https://secure.simmarket.com/aerosoft-airport-istanbul-x-plane-11.phtml |
| MSFS 2020 | SceneryTR | SceneryTR | Can be bought from MarketPlace
OR https://secure.simmarket.com/scenerytr-istanbul-airport-ltfm_msfs.phtml |
Freeware

There are also freeware options available for Istanbul Airport. However there is significant difference in quality.
| Simulator | Developer | Publisher | Links |
|---|---|---|---|
| FSX/P3D | Hakan Daghan, Kamil Uzun, Erman Gokman Pilicoglu, Muhtesem Firtina Ozcinar | Turkish Virtual | https://turkishvirtual.com/turkishvirtual_LTFM_scenerys.asp |
| X-Plane | Mali Oguducu, Hayri Buberci, Kamil Uzun, Muhtesem Firtina Ozcinar | Turkish Virtual | https://turkishvirtual.com/turkishvirtual_LTFM_scenerys.asp |
| MSFS 2020 | Hayri Buberci, Mali Oguducu, Kamil UZUN, M Firtina Ozcinar | Turkish Virtual | https://turkishvirtual.com/turkishvirtual_LTFM_scenerys.asp |
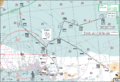
Arrival Procedures
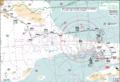
Istanbul Airport is located within Yesilkoy TMA (Terminal Manoeuvring Area). Yesilkoy TMA covers Istanbul Airport (LTFM), Sabiha Gokcen Airport (LTFJ), Ataturk Airport (LTBA), Samandira Airbase (LTBX), Corlu Ataturk Airport (LTBU), Hezarfen Municipal Airport (LTBW), Cengiz Topel Airport (LTBQ), Canakkale Airport (LTBH), Bursa Yunuseli Airport (LTBE) and Bursa Yenisehir Airport (LTBQ).
Istanbul Airport utilizes RNAV in all of its procedures. In addition, P-RNAV (Precision-Area Navigation, RNP1) capability is required. If unable, pilot must inform the controller so that aircraft can be given radar vectors to final. Arrival into Istanbul Airport might seem complicated to some pilots however it is actually very simple. LTFM STARs utilize PMS (Point Merge System) for efficient airspace control, separation, and to control traffic flow within Yesilkoy TMA. All STARs utilize idle descent philosophy until PMS entry. These point merge systems act as an arc of a circle and ease air traffic control.
STARs
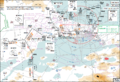
The STARs at Istanbul airport are designed to be ambiguous between the active runways. For instance, if northern config is active, RILEX2A STAR will end at IMREN waypoint, and IMREN is IAF (Initial Approach Fix) for all approach procedures for all northern runways. This means, whether you land at 34L, 35R or 36 (when north config is active), you still use the same STAR procedure for all runways. You can find the STAR designator table on the next page.
| Active Runway Configuration | ||||||
|---|---|---|---|---|---|---|
North Configuration uses the following STAR identifiers.
| ||||||
South Configuration uses the following STAR identifiers.
|
As Istanbul Airport utilizes multiple configurations depending on traffic, weather, congestion, NOTAMs etc. You might be cleared to a different STAR compared to another traffic that is flying exactly the same route as you. Default designators for northern config (34/35/36) is 2A and default designator for southern configuration (16/17/18) is 2B. These STARs keep the traffic arriving west to use the west PMS and traffic arriving from east to use the east PMS. 2N and 2P STARs are designed to ease the workload of a PMS, by making the traffic to use the opposite PMS (traffic arriving from west to use the east PMS or to enter PMS from north instead of south at different altitude e.g).
North Config
ATPIX 2A, ERSEN 2N and RIXEN 2N

ATPIX 2N
DRAMO 2A and INBET 2A
ERSEN 2A and SISPI 2A
RILEX 2A and RIXEN 2A
RILEX 2N


South Config
DRAMO 2B, 2P and INBET 2B, 2P
ERSEN 2B and SISPI 2B
ERSEN 2P and SISPI 2P
RILEX 2B and RIXEN 2B

RIXEN 2P and ATPIX 2B


Transitions and Approach Phase

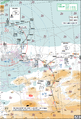
As mentioned previously, Istanbul Airport utilizes Point-Merge System. Each PMS leads to last point of the STAR and the entry point of the approach transition . For northern config, IAF for west PMS is IMREN, for east config it is SADIK. For south config, IAF for west PMS is INSTA and for east PMS it is DIVDI. Flying the correct transition is crucial and must. Each pilot is responsible for selecting the correct transition. This transition is NOT a STAR transition but transition for the approach procedure. There are different approach procedures and each has different transition phase (both laterally and vertically), go around procedure and used differently to streamline the independent parallel approach procedure . As a pilot, you must make sure you have programmed your FMS using the correct approach procedure and transition. If ATC clears the traffic for ILS-X 35R via IMREN transition, it is pilot's responsibility to fly ILS-X approach via IMREN transition. Since transitions are a must as they play a crucial role in the independent parallel approach procedure, pilot's must fly the transition both laterally and vertically at all times. If the transition is not selected correctly in the aircraft's FMS, the plane will fly directly to FAF, skipping the transition completely. This is not allowed for approach procedure into Istanbul as each approach procedure and transition is very different than one another, both laterally and vertically. You can see an example of how ILS-X and ILS-Z transition differs from the pictures below (you can see they are both laterally and vertically different).
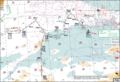
Ground Layout
Istanbul airport is on the list of biggest airports as per surface area, with staggering 76.5 million m2 of land area. The airport has 5 runways, 34L/16R, 34R/16L, 35L/17R, 35R/17L and 36/18. Between RWYs 34 and 35, the main MRO and cargo area can be found. Between RWY 35 and 36, main passenger terminal and the stands can be found. Most gates and stands utilize MARS (Multiple Aircraft Ramp System). This increases the efficiency and gate usage significantly. With the MARS system, one gate can be shared by either 2 small to medium aircraft or 1 heavy (widebody) aircraft. In Istanbul Airport, MARS system uses L (as left) and R (as right) abbreviations for medium/split gates. For instance B4 gate is used by either 1 heavy aircraft or 2 medium aircrafts use B4L (Gate B 4 Left) and B4R (Gate B 4 Right).

Aprons and Terminal

Main Passenger Terminal and Terminal Contact Apron
Passenger terminal at Istanbul Airport both house international and domestic traffic. The gates are split into piers and identifiers.

| Gates/Pier | International | Domestic |
|---|---|---|
| A Gates | X | |
| B Gates | X | |
| C Gates | X | |
| D Gates | X | |
| E Gates | X | |
| F Gates | X* | F1 |
| G Gates | X |
C and E gates are only medium gates and are connected directly to the main building. A, B, C, D, F and G gates are located in their respective piers.
A Pier
A gates/pier is only for international flights. Gate A9 is the only gate that does not have MARS system. Gate A2 is only the one of the 2 gates that is equipped with third jetbridge, which is used for A380 flights.
B Pier
B gates/pier is used located in international area of the terminal and only international flights use these gates. Gates B1, B3, B5, B6, B7, B8, B9, B10, B12 and B18 utilize MARS system. Gates B4, B13, B14, B15, B16, B17 are heavy gates. Gate B2 is only to be used by small to medium aircraft.
C Gates
C gates are located in the West Cul-de-Sac of the terminal complex and have only 4 gates. All gates (C1, C2, C3, C4) are to medium gates.
D Pier
D Pier is used heavily by long range flights due to being the most heavy gates. Out of 19 gates, only gates D1, D2, D3, D4 are medium gates. Rest of them are heavy only.
E Gates
Just like C gates, E gates have only gates (E1, E2, E3, E4). They are located in the East Cul-de-Sac.
F Pier
F pier has mix of gates and flights. Gate F2 is medium only whereas gates F3, F4, F5, F6, F7, F8, F9, F12, F13 use MARS. Gates F14, F15, F16, F17, F18, F19 are heavy only gates. F1 gate uses MARS however is domestic only.

G Pier
G pier is to be used only for domestic flights. Entire G pier utilizes MARS.
Apron 1
Apron 1 is located north of Terminal Area, situated between taxiways D and G. It contains 33 medium stands (100-132 and 149) and 16 MARS stands (133-148).
Apron 2 and 3

Apron 2 is situated south of A pier and Apron 3 is located south of G pier. Both aprons contain MARS and narrowbody-only stands. 2xx stands represent stands located in apron 2 and 3xx stands in apron 3. Stands 218, 219, 225 and 226 are used by Turkish Technic and should not be used. Stands 316, 317, 318, 319 is used only for VIP.
For Apron 2:
- 200 - 214 -> Medium gates
- 220 - 224 -> MARS

For Apron 3:
- 300 - 312 -> Medium gates
- 313 - 315 -> MARS
Cargo and MRO Aprons
Located between runways 34R/16L and 35L/17R, there are 5 cargo aprons and 2 MRO aprons. Cargo stands start with K. Stands K1, K2, K3, K4, K5, K6, K7, K8, K9 all utilize MARS wheres the remaining stands K10-K21 (used ONLY by Turkish Cargo) and K50-K57 are heavy gates. 4xx and 5xx stands are used only by Turkish Technic.
Pushback Procedures
Each gate/stand in Istanbul Airport has published standard and alternative pushback procedure. These procedures increase efficiency of the aprons, gates, ground movements and streamline the traffic flow through out the airport. You might see abbreviations such as PSN. There are "Pushback Positions" which act as point where aircraft should pushback to.


Southwest Area | A Pier
| Stand | Pushback Procedure | Caution | Phraseology |
|---|---|---|---|
| A2L thru
A2R |
Standard
The ACFT shall be pushed back following the pushback line onto TWY T2 to face North and continue push until TWY E8 will remain clear of ACFT. |
HS8
(Be aware of the ACFT pushbacks from stands A2L, A2, B1 and B1R). |
Pushback Approved
Face North |
| Alternate
The ACFT shall be pushed back following the pushback line onto TWY T2 to face South and continue push until TWY E8 will remain clear of ACFT. |
Pushback Approved
Face South | ||
| A3L thru
A7R |
Standard
The ACFT shall be pushed back following the pushback line onto TWY T2 to face North. |
Pushback Approved
Face North | |
| Alternate
The ACFT shall be pushed back following the pushback line onto TWY T2 to face South. |
Pushback Approved
Face South | ||
| A8L thru
A8R |
Standard
The ACFT shall be pushed back following the pushback line onto TWY T2 to face North. TWY E5 will remain clear of ACFT. |
Pushback Approved
Face North | |
| Alternate
The ACFT shall be pushed back following the pushback line onto TWY T2 to face South. |
Pushback Approved
Face South | ||
| A9 | Standard
The ACFT shall be pushed back following the pushback line onto TWY T2 to face South. |
Pushback Approved
Face South | |
| Alternate
The ACFT shall be pushed back following the pushback line onto TWY T2 to face North, then pulled forward until TWY E5 will remain clear of ACFT. |
Pushback Approved
Face North | ||
| A10
A11 |
Standard
The ACFT shall be pushed back following the pushback line onto TWY E3 to face North until its nosewheel is at the PSN5 point. |
E2 TWY
is CAT C. |
Pushback Approved
PSN5 |
| A10L, A10R
A11L, A11R |
Standard
The ACFT shall be pushed back following the pushback line onto TWY E3 to face North until its nosewheel is at the PSN5 point. |
Pushback Approved
PSN5 | |
| Alternate
The ACFT shall be pushed back following the pushback line onto TWY E2 to face North and continue push until TWY T2 will remain clear of ACFT. |
Pushback Approved
Face North on E2 TWY |


Terminal Contact Apron | Northwest Area
| Stand | Pushback Procedure | Caution | Phraseology |
|---|---|---|---|
| B1L thru
B1R |
Standard
The ACFT shall be pushed back following the pushback line onto TWY T2 to face South and continue push until TWY E8 will remain clear of ACFT. |
HS8
(Be aware of the ACFT pushbacks from stands A2L, A2, B1 and B1R). |
Pushback Approved
Face South |
| Alternate
The ACFT shall be pushed back following the pushback line onto TWY T2 to face North and continue push until TWY E8 will remain clear of ACFT. |
Pushback Approved
Face North | ||
| B3L thru B3R
B5L thru B5R B7L thru B7R B9L thru B9R B12L thru B12R B13 |
Standard
The ACFT shall be pushed back following the pushback line onto TWY T2 to face South. |
Pushback Approved
Face South | |
| Alternate
The ACFT shall be pushed back following the pushback line onto TWY T2 to face North. |
Pushback Approved
Face North | ||
| B14
B15 B16 |
Standard
The ACFT shall be pushed back following the pushback line onto TWY NW to face West. |
The ACFT
pushing back from stand B14 facing East should pull forward until T2 TWY is clear. |
Pushback Approved
Face West |
| Alternate
The ACFT shall be pushed back following the pushback line onto TWY NW to face East. |
Pushback Approved
Face East |


Terminal Contact Apron | West Cul-de-Sac Area
| Stand | Pushback Procedure | Caution | Phraseology |
|---|---|---|---|
| B10L thru
B10R B17 B18L thru B18R |
Standard
The ACFT shall be pushed back following the pushback line onto TWY T3 facing South. Taxi out via TC TWY. |
The ACFT
pushing back from stand B17 should pull forward until NW TWY is clear. CAT D and E ACFTs pushing back face South shall use TWY TC. |
Pushback Approved
Face South |
| Alternate
The ACFT shall be pushed back following the pushback line onto TWY T3 facing North. |
Pushback Approved
Face North | ||
| D13
D15 D17 |
Standard
The ACFT shall be pushed back following the pushback line onto TWY T5 facing North. |
CAT D and E
ACFTs pushing back face South shall use TWY TC. |
Pushback Approved
Face North |
| Alternate
The ACFT shall be pushed back following the pushback line onto TWY T5 facing South. |
Pushback Approved
Face South | ||
| D19 | Standard
The ACFT shall be pushed back following the pushback line onto TWY T5 facing North. |
Pushback Approved
Face North | |
| Alternate
The ACFT shall be pushed back following the pushback line onto TWY NW facing East and continue push until TWY T3 will remain clear of ACFT. |
Pushback Approved
Face East on NW TWY | ||
| B4 | Standard
The ACFT shall be pushed back following the pushback line onto TWY T3 facing South and continue push until its nosewheel is at PSN1 point. Taxi out via TC TWY. |
HS4
(Be aware of the ACFT pushbacks from stands B2, B4, C1, C2, C3, C4, D1, D3 and D5). |
Pushback Approved
PSN1 |
| Alternate
The ACFT shall be pushed back following the pushback line onto TWY T3 facing South, then pulled forward until its nosewheel is at the PSN2 point on TWY T5 facing North. |
Pushback Approved
PSN2 | ||
| B6L thru
B6R B8L thru B8R |
Standard
The ACFT shall be pushed back following the pushback line onto TWY T3 facing South and continue push until its nosewheel is at the PSN1 point.Taxi out via TC TWY. |
HS6
(Be aware of the ACFT pushbacks from stands B6R and B8L). CAT D and E ACFTs pushing back face South shall use TWY TC. |
Pushback Approved
PSN1 |
| Alternate
The ACFT shall be pushed back following the pushback line onto TWY T3 facing North abeam stand B6, TWY TC will remain clear of ACFT. |
Pushback Approved
Face North Abeam Stand B6 | ||
| D7
D9 D11 |
Standard
The ACFT shall be pushed back following the pushback line onto TWY T5 facing North, then pulled forward until its nosewheel is at the PSN2 point. |
CAT D and E
ACFT pushing back face South shall use TWY TC. |
Pushback Approved
PSN2 |
| Alternate
The ACFT shall be pushed back following the pushback line onto TWY T5 facing South and continue push until abeam stand D11. Taxi out via TC TWY. |
Pushback Approved
Face South Abeam Stand D11 | ||
| B2
C3 C4 |
Standard
The ACFT shall be pushed back following the pushback line onto TWY T3 facing South. Taxi out via T5 TWY. |
HS4
(Be aware of the ACFT pushbacks from stands B2, B4, C1, C2, C3, C4, D1, D3 and D5). |
Pushback Approved
Face South on T3 TWY |
| Alternate
The ACFT shall be pushed back following the pushback line onto TWY facing West abeam stand C2. Taxi out via T3 TWY. |
Pushback Approved
Face West | ||
| C1
C2 D1 D3 D5 |
Standard
The ACFT shall be pushed back following the pushback line onto TWY facing East abeam stand C3. Taxi out via T5 TWY. |
HS4
(Be aware of the ACFT pushbacks from stands B2, B4, C1, C2, C3, C4, D1, D3 and D5). |
Pushback Approved
Face East |
| Alternate
The ACFT shall be pushed back following the pushback line onto TWY T5 facing South abeam stand D7. Taxi out via T3 TWY. |
Pushback Approved
Face South on T5 TWY |


Terminal Contact Apron | East Cul-de-Sac Area
| Stand | Pushback Procedure | Caution | Phraseology |
|---|---|---|---|
| D12
D14 D16 |
Standard
The ACFT shall be pushed back following the pushback line onto TWY T7 facing North. |
CAT D and E
ACFTs pushing back face South shall use TWY TD. |
Pushback Approved
Face North |
| Alternate
The ACFT shall be pushed back following the pushback line onto TWY T7 facing South. |
Pushback Approved
Face South | ||
| D20 | Standard
The ACFT shall be pushed back following the pushback line onto TWY T7 facing North. |
Pushback Approved
Face North | |
| Alternate
The ACFT shall be pushed back following the pushback line onto TWY NE facing West and continue push until TWY T9 will remain clear of ACFT. |
Pushback Approved
Face Wast on NE TWY | ||
| F12L thru
F12R F14 |
Standard
The ACFT shall be pushed back following the pushback line onto TWY T9 facing South. |
CAT D and E
ACFTs pushing back face South shall use TWY TD. |
Pushback Approved
Face South |
| Alternate
The ACFT shall be pushed back following the pushback line onto TWY T9 facing North. |
Pushback Approved
Face North | ||
| D6
D8 D10 |
Standard
The ACFT shall be pushed back following the pushback line onto TWY T7 facing North, then pulled forward until its nosewheel is at the PSN4 point. |
CAT D and E
ACFTs pushing back face South shall use TWY TD. |
Pushback Approved
PSN4 |
| Alternate
The ACFT shall be pushed back following the pushback line onto TWY T7 facing South and continue push until abeam stand D10. |
Pushback Approved
Face South Abeam Stand D10 | ||
| F4L thru
F4R |
Standard
The ACFT shall be pushed back following the pushback line onto TWY T9 facing South and continue push until its nosewheel is at the PSN3 point. |
HS5
(Be aware of the ACFT pushbacks from stands D2, D4, E1, E2, E3, E4, F2, F4L, F4 and F4R). |
Pushback Approved
PSN3 |
| F4 | Alternate
The ACFT shall be pushed back following the pushback line onto TWY T9 facing South then pulled forward until its nosewhell is at the PSN 4 on TWY T7 face North. |
Pushback Approved
PSN4 | |
| F4L
F4R |
Alternate
The ACFT shall be pushed back following the pushback line onto TWY facing East abeam stand E3. Taxi out via T9 TWY. |
Pushback Approved
Face East | |
| D2
D4 E1 E2 |
Standard
The ACFT shall be pushed back following the pushback line onto TWY facing West abeam stand E3. Taxi out via T7 TWY. |
HS5
(Be aware of the ACFT pushbacks from stands D2, D4, E1, E2, E3, E4, F2, F4L, F4 and F4R). |
Pushback Approved
Face West |
| Alternate
The ACFT shall be pushed back following the pushback line onto TWY T7 facing South abeam D6. Taxi out via T9 TWY. |
Pushback Approved
Face North Abeam Stand F6 | ||
| E3 | Standard
The ACFT shall be pushed back following the pushback line onto TWY T9 facing South abeam stand F4. Taxi out via T7 TWY. |
HS5
(Be aware of the ACFT pushbacks from stands D2, D4, E1, E2, E3, E4, F2, F4L, F4 and F4R). |
Pushback Approved
Face South on T9 TWY |
| Alternate
The ACFT shall be pushed back following the pushback line onto TWY T7 facing South abeam stand D6. Taxi out via T9 TWY. |
Pushback Approved
Face South on T7 TWY | ||
| E4
F2 |
Standard
The ACFT shall be pushed back following the pushback line onto TWY T9 facing South abeam stand F4 Taxi out via T7 TWY. |
HS5
(Be aware of the ACFT pushbacks from stands D2, D4, E1, E2, E3, E4, F2, F4L, F4 and F4R). |
Pushback Approved
Face South on T9 TWY |
| Alternate
The ACFT shall be pushed back following the pushback line onto TWY facing East abeam stand E3. Taxi out via T9 TWY. |
Pushback Approved
Face East |
Terminal Contact Apron | Northwest area
| Stand | Pushback Procedure | Caution | Phraseology |
|---|---|---|---|
| F1L thru
F1R |
Standard
The ACFT shall be pushed back following the pushback line onto TWY T11 facing South and continue push until TWY F6 will remain clear of ACFT. |
HS9
(Be aware of the ACFT pushbacks from stands F1L, F1 and G2, G2R). |
Pushback Approved
Face South |
| Alternate
The ACFT shall be pushed back following the pushback line onto TWY T11 facing North and continue push until TWY F6 will remain clear of ACFT. |
Pushback Approved
Face North | ||
| D20 | Standard
The ACFT shall be pushed back following the pushback line onto TWY T7 facing North. |
Pushback Approved
Face North | |
| Alternate
The ACFT shall be pushed back following the pushback line onto TWY NE facing West and continue push until TWY T9 will remain clear of ACFT. |
Pushback Approved
Face Wast on NE TWY | ||
| F12L thru
F12R F14 |
Standard
The ACFT shall be pushed back following the pushback line onto TWY T9 facing South.The ACFT shall be pushed back following the pushback line onto TWY T7 facing North. |
CAT D and E
ACFTs pushing back face South shall use TWY TD. |
Pushback Approved
Face South |
| Alternate
The ACFT shall be pushed back following the pushback line onto TWY T9 facing North.The ACFT shall be pushed back following the pushback line onto TWY T7 facing North. |
Pushback Approved
Face North | ||
| D6
D8 D10 |
Standard
The ACFT shall be pushed back following the pushback line onto TWY T7 facing North, then pulled forward until its nosewheel is at the PSN4 point |
CAT D and E
ACFTs pushing back face South shall use TWY TD. |
Pushback Approved
PSN4 |
| Alternate
The ACFT shall be pushed back following the pushback line onto TWY T7 facing South and continue push until abeam stand D10.The ACFT shall be pushed back following the pushback line onto TWY T7 facing North. |
Pushback Approved
Face South Abeam Stand D10 | ||
| F4L thru
F4R |
Standard
The ACFT shall be pushed back following the pushback line onto TWY T9 facing South and continue push until its nosewheel is at the PSN3 point. |
HS5
(Be aware of the ACFT pushbacks from stands D2, D4, E1, E2, E3, E4, F2, F4L, F4 and F4R). |
Pushback Approved
PSN3 |
| F4 | Alternate
The ACFT shall be pushed back following the pushback line onto TWY T9 facing South then pulled forward until its nosewhell is at the PSN 4 on TWY T7 face North The ACFT shall be pushed back following the pushback line onto TWY T7 facing North. |
Pushback Approved
PSN4 | |
| F4L
F4R |
Alternate
The ACFT shall be pushed back following the pushback line onto TWY facing East abeam stand E3. Taxi out via T9 TWY. |
Pushback Approved
Face East | |
| D2
D4 E1 E2 |
Standard
The ACFT shall be pushed back following the pushback line onto TWY facing West abeam stand E3. Taxi out via T7 TWY. |
HS5
(Be aware of the ACFT pushbacks from stands D2, D4, E1, E2, E3, E4, F2, F4L, F4 and F4R). |
Pushback Approved
Face West |
| Alternate
The ACFT shall be pushed back following the pushback line onto TWY T7 facing South abeam D6. Taxi out via T9 TWY. |
Pushback Approved
Face North Abeam Stand F6 | ||
| E3 | Standard
The ACFT shall be pushed back following the pushback line onto TWY T9 facing South abeam stand F4. Taxi out via T7 TWY. |
HS5
(Be aware of the ACFT pushbacks from stands D2, D4, E1, E2, E3, E4, F2, F4L, F4 and F4R). |
Pushback Approved
Face South on T9 TWY |
| Alternate
The ACFT shall be pushed back following the pushback line onto TWY T7 facing South abeam stand D6. Taxi out via T9 TWY. |
Pushback Approved
Face South on T7 TWY | ||
| E4
F2 |
Standard
The ACFT shall be pushed back following the pushback line onto TWY T9 facing South abeam stand F4 Taxi out via T7 TWY. |
HS5
(Be aware of the ACFT pushbacks from stands D2, D4, E1, E2, E3, E4, F2, F4L, F4 and F4R). |
Pushback Approved
Face South on T9 TWY |
| Alternate
The ACFT shall be pushed back following the pushback line onto TWY facing East abeam stand E3. Taxi out via T9 TWY. |
Pushback Approved
Face East |
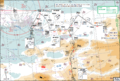
Taxi Procedures
Istanbul Airport is very big and might seem scary regarding all the taxiways and size however the pre-defined taxi procedures make it very easy for both pilots and ATC. This section outlines these procedures, taxi limits, speed limits and terminal area.
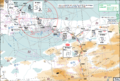
Terminal Area
Main terminal has predefined exits and routes. These predefined routes and directions help ease the traffic flow and ground movement in the airport. As it can be seen below from the picture, the
